Core Admin FAQ Presentation (Fixing link)
External Customers refer to invoice payment advice here: https://tiny.ucsf.edu/iLabAR
Billing tab:
4) Create a New Billing Event
UCSF/iLab Billing Manual
View Step by Step instructions on the monthly billing process for cores in iLab
1) Managing Permissions
Many cores allow specific equipment to be scheduled only if a user has specific permissions, which means that Core Administrators need to keep their permission status in iLab up to date. Managing permissions is typically done from the People Tab of your core or through each individual piece of equipment.
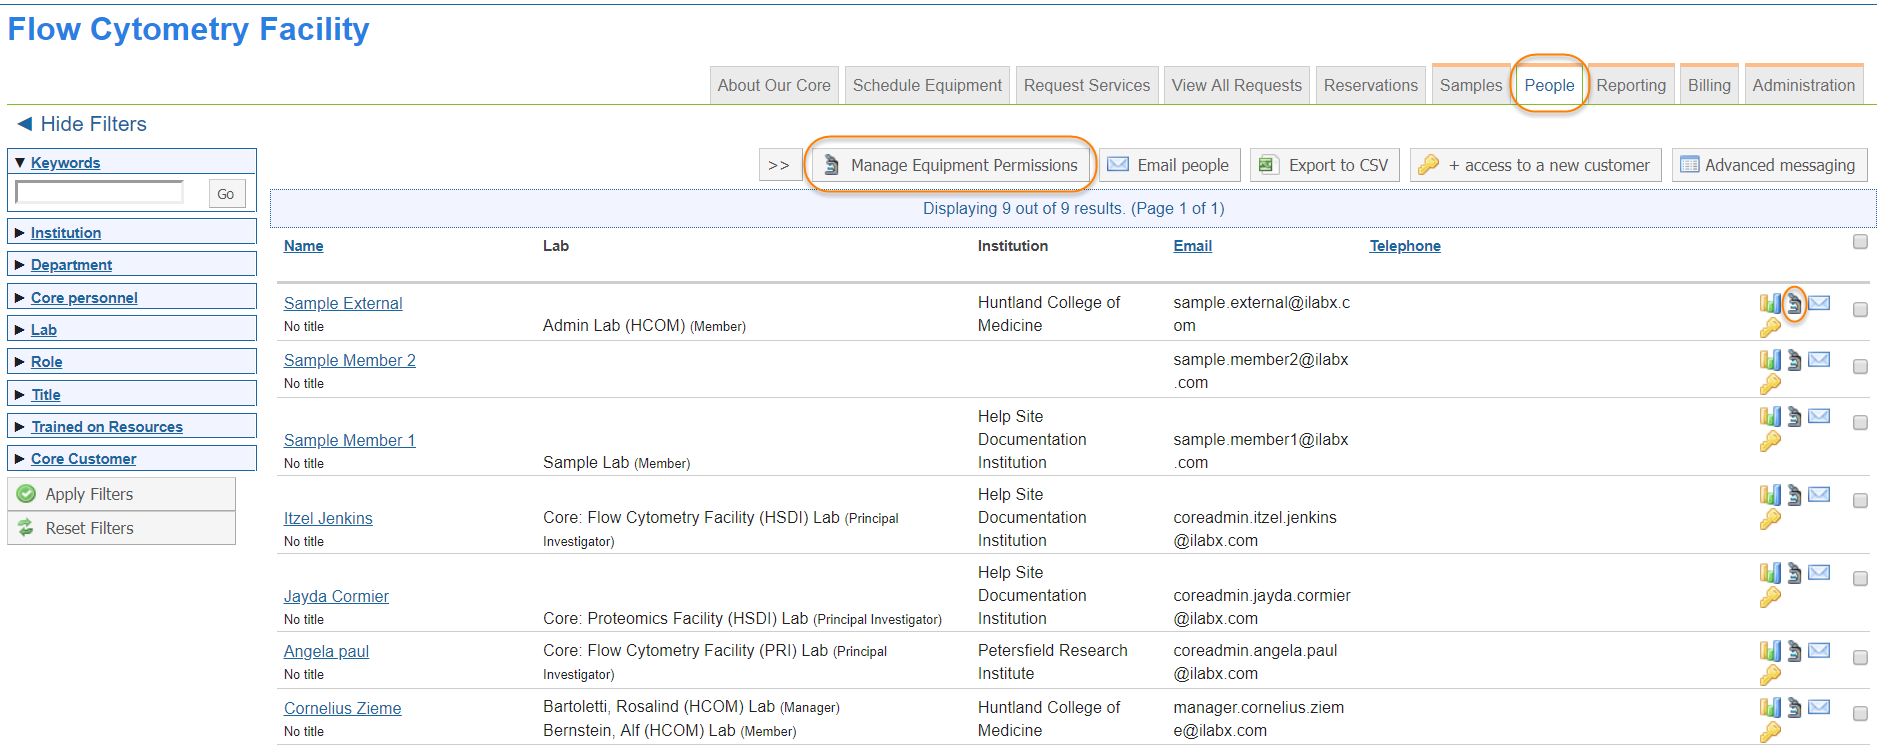
You can set the permissions group for a number of selected users all at once. To do so, first select the users you want to update by clicking the check-boxes on the right-hand side of the screen (you can click the check box in the top-right to select all listed users). Then, click the "Manage Equipment Permissions" button at the top of the interface.
Alternatively, you can click on the microscope icon for an individual user to just update that specific customer.
In each case, another interface opens up that shows the current permission group assigned to each user.
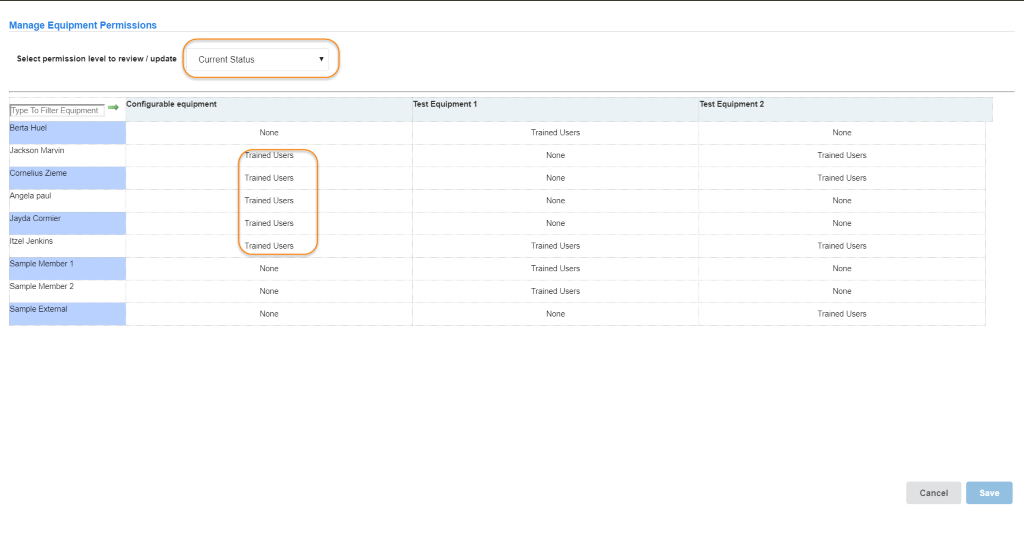
To change permissions, you will need to select the permission group you would like to assign from the drop-down.
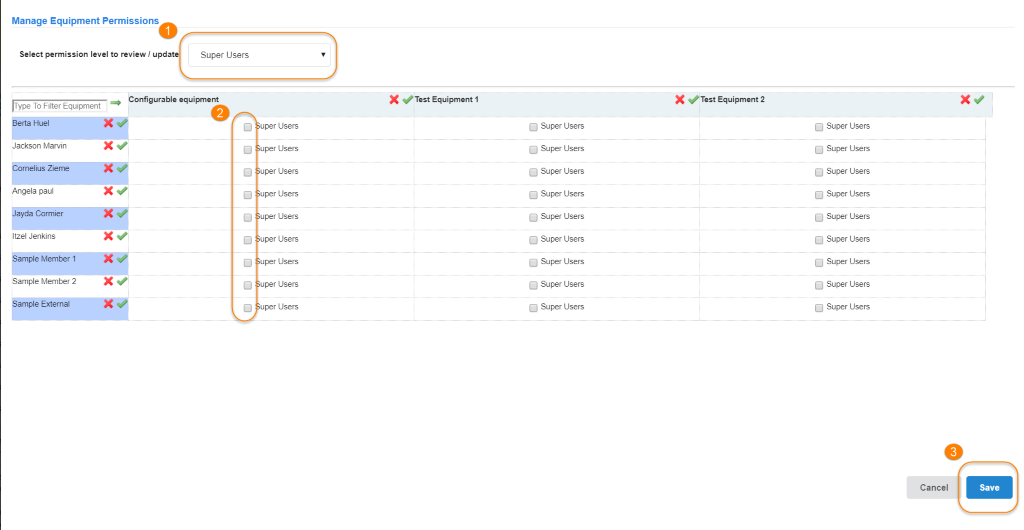
- Use the dropdown to select the permission you would like to update.
- Check the box to select that permission for the user/group OR use the green checkmark to add that permission for all users in the column or for all instruments for a user in the row. Conversely, to de-select all resources, click the red X beside the user name.
- Click on Save
Permissions have now been updated across users and instruments.
2) Members Settings
The Members Panel is a list of all core or administration staff who have access to manage your core. The Members panel is accessed through the Administration tab. From the Members Panel, you may add new members to your core, view and edit the role of existing members, edit member profile details, or delete current members.
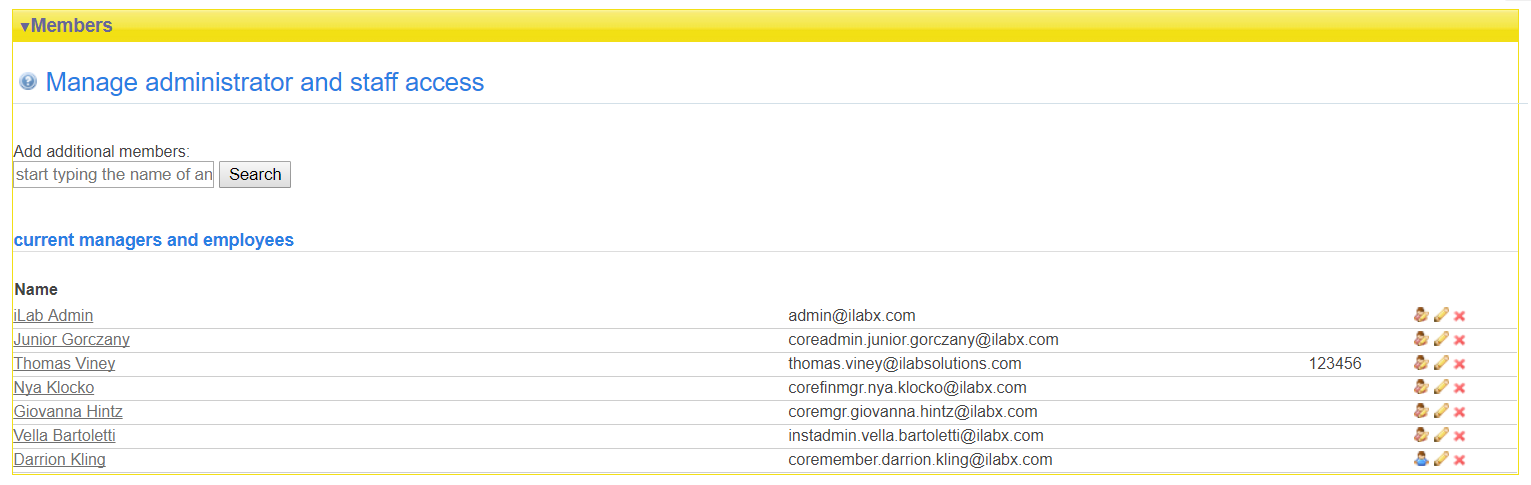
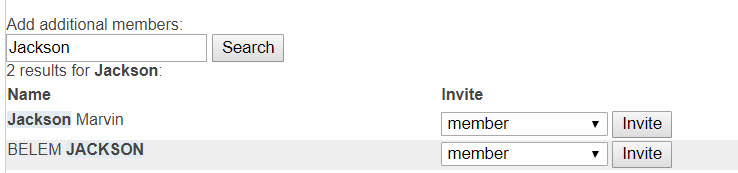
To add an additional member to your core, type their name into the search box. When the correct person displays, select the role you wish to assign to them, and click the "Invite" button. Helpful Hint: If two people have the same name, you can hover over the name to see the email associated with each individual.
Roles available are:
- member: Members may manage workflow. They can approve equipment reservations, add services and milestones, and complete charges for billing.
- manager: Managers may manage workflow and may edit equipment and services (if their institution allow for it), and also run billing and reporting.
- financial manager: Financial manager has access to the above roles but also can manage facility members.
- admin: Admins can complete all tasks available to members, managers, and financial managers, along with access to all administration settings.
To view the role of existing members, hover over the people icon. Hover text will display their role. To edit a member's role, email or phone number, click on the yellow pencil icon. Save all changes.
To delete a member, click the red X beside the name you wish to remove.
3) Pricing
The pricing panel is used to override a customer's assigned price type. Price types can be defined at the institutional, group or individual level, with the more specific definition taking precedence. For example, if a user's institution is set to the "External Not for Profit" price type, but that user's lab is set to "Internal" pricing, the latter price type will apply.
Note that default behavior in iLab will set the price type to "Internal" for all users of the institution that the core is a part of, while it is set to "External for Profit" for all users of institutions outside the one the core belongs to. Other price types need to be applied manually, such as the "External Not for Profit" and "Affiliate" price type.
The Pricing panel is located on the Administration tab of your core:
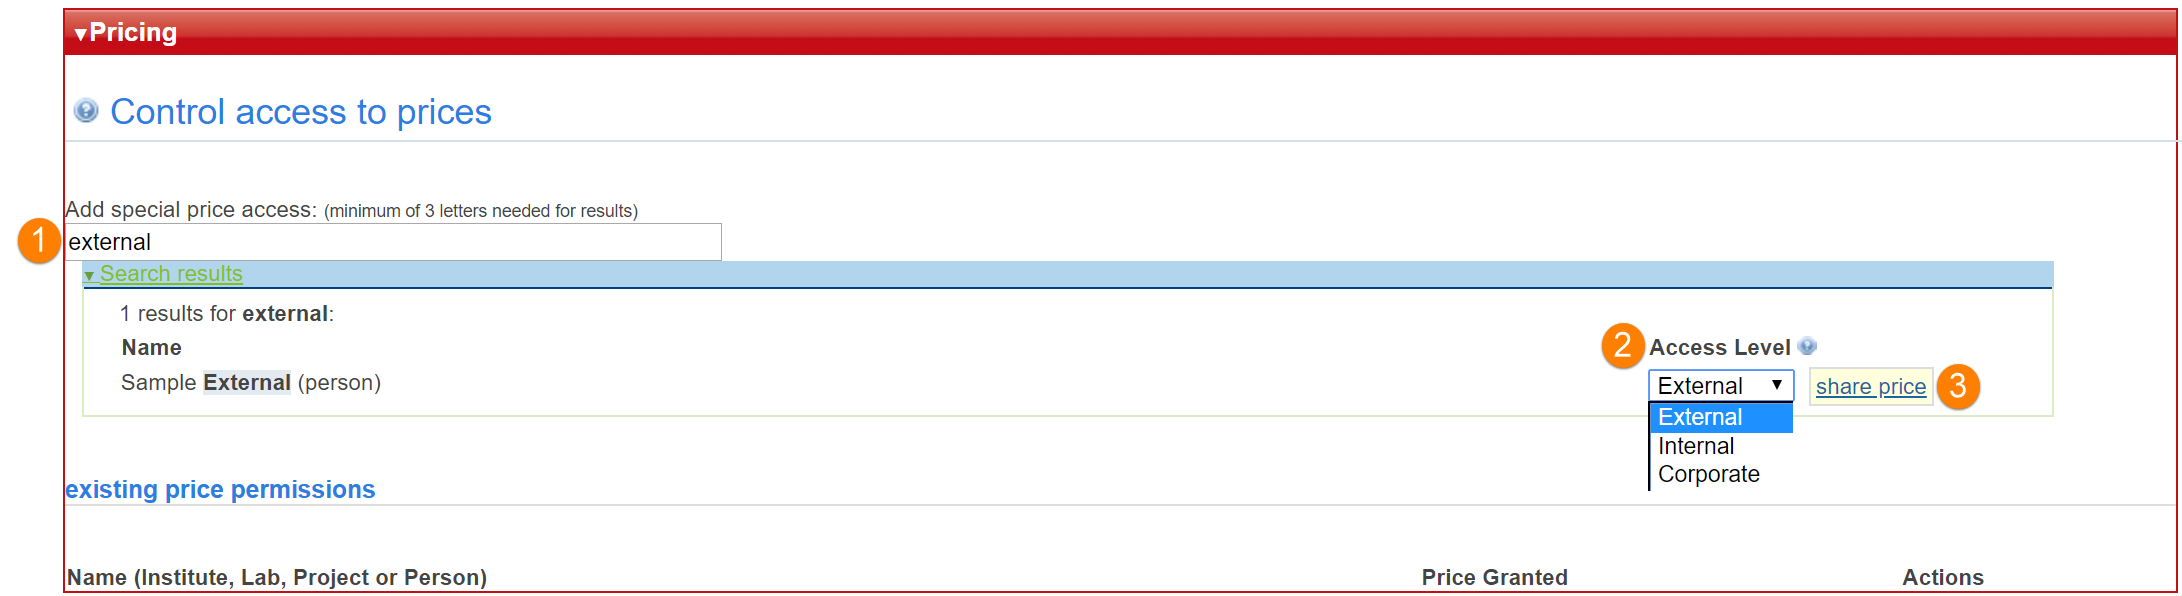
To add a new price type override:
- Type (part of) the institution, group or user in the "Add special price access" search box
- Set the desired access level
- Click "Share price" to confirm
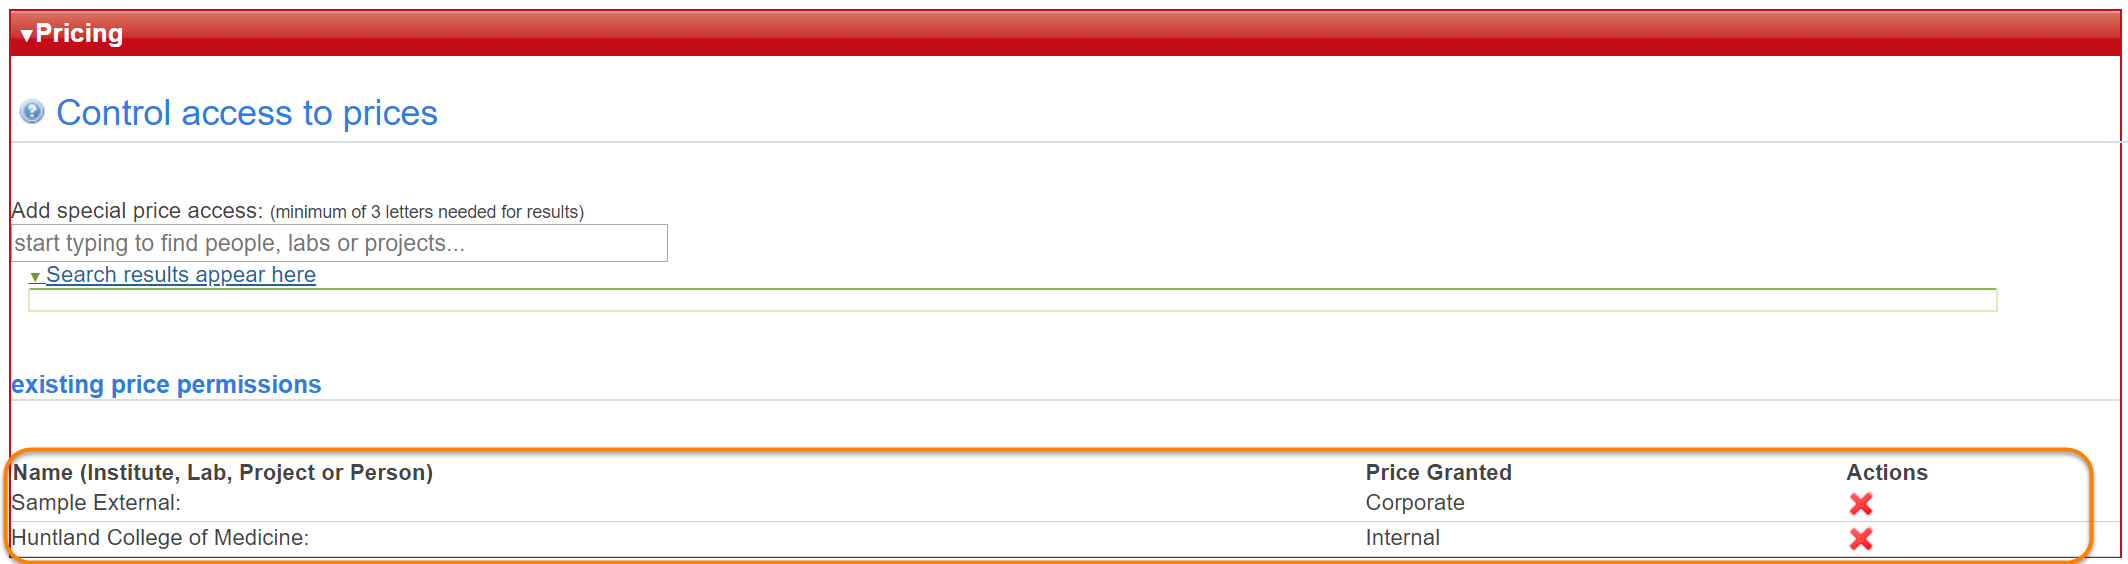
Your selected customer and their new access level will display at the bottom of the panel. Delete any selections by clicking on the red X beside the name.
4)Create a New Billing Event
To create a new billing event, navigate to the Billing tab of your core. Click the "New Billing Event" button.
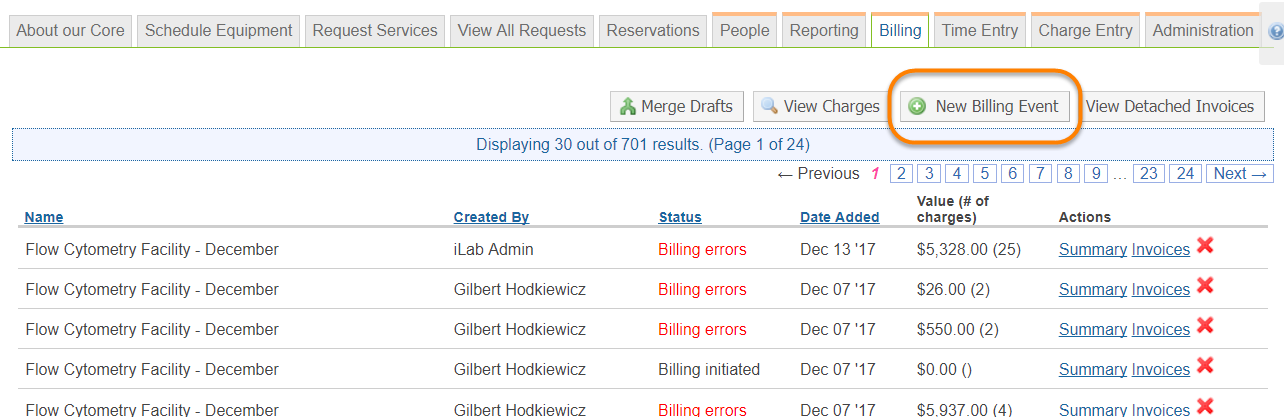
The Create a New Billing Event screen displays. You will have three steps to complete.
Step 1: Define which charges should be included in this billing event by adjusting the parameters, then click "Load Charges".
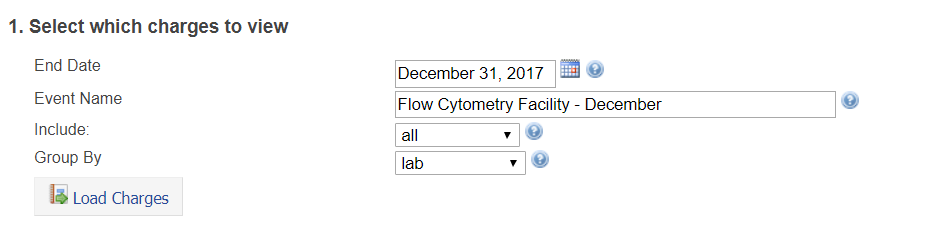
Parameters that can be set:
- End Date: All charges confirmed or completed on or before this date will be searched for.
- Event Name: Designate a name for this billing event. By default, the system will append the current month to the name of the core.
- Include: Filter for internal charges or external charges. The default is "all".
- Group By: Set how charges should be grouped when creating invoices. You can group by Lab, Researcher, Request ID, or Payment Info. By default, invoices are grouped by lab.
Once parameters have been defined, click on the "Load Charges" button. All the charges within the defined parameters will display.
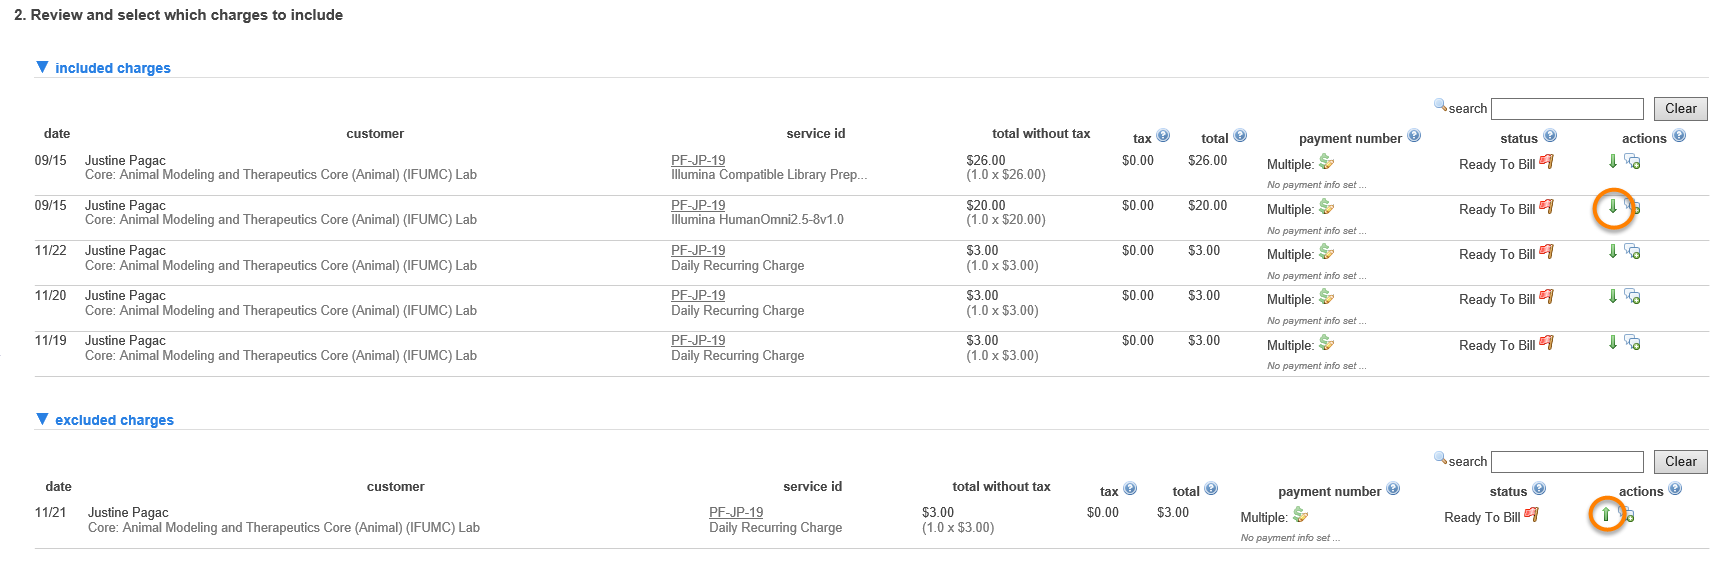
Step 2: Designate which charges will be included and which will excluded (if any). By default, all eligible charges are included. To exclude a charge, click on the green down arrow beside the charge. It will move to the excluded charges section. To include a charge that was previously excluded, click on the green up arrow. Similarly, the charge will display in the included charges section.
Step 3: Choose whether you would like to create the billing event, save the billing event as a draft, or cancel the billing event.
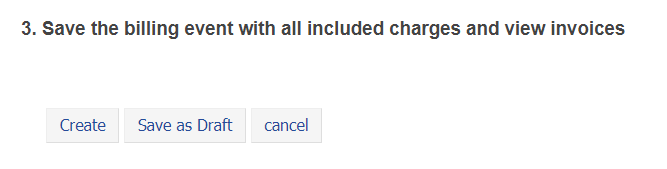
If you select to create the billing event, your new billing event will now display on the Billing tab in the list of billing events. You will be able to view the Summary of the billing event or the Invoices from the links listed.

Save as a Draft Billing Event
Saving billing events as a draft provides a core the flexibility to review and organize charges over the course of their billing cycle without committing charges to an invoice. This can be helpful for higher volume cores, or facilities that have longer billing cycles, or in cases where Institution Administration handles customer invoicing. Additionally, it gives institution administrators the ability to review charges before invoices are generated.
To create a draft event follow Step 1 to Step 3 above and select "Save as Draft" under Step 3 on the New Billing Event page.
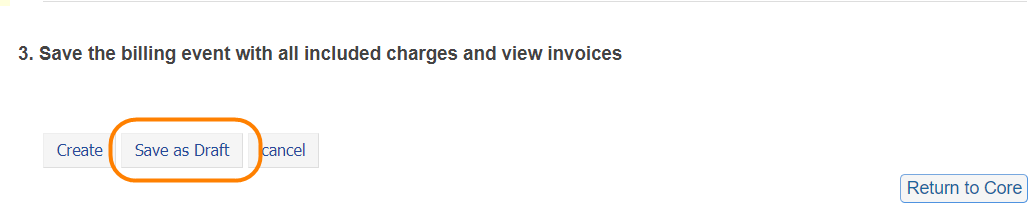
The screen returns you to the Billing tab, where you can view the summary or edit the charges in your new draft billing event.

Edit a Draft Billing Event
When a draft billing event is created, a summary of your charges included in this event are visible from the "Summary" link. You can also continue to add charges to the billing event using the Edit link.
From the edit link, you will be directed to the Edit Draft tab or you can navigate to the Edit Draft tab from the Summary link.

From the Edit Draft tab, you have the option to edit and/or add charges.
Step 1: From the "Load Additional Charges" button, you can set new parameters to include additional charges to this draft billing event. 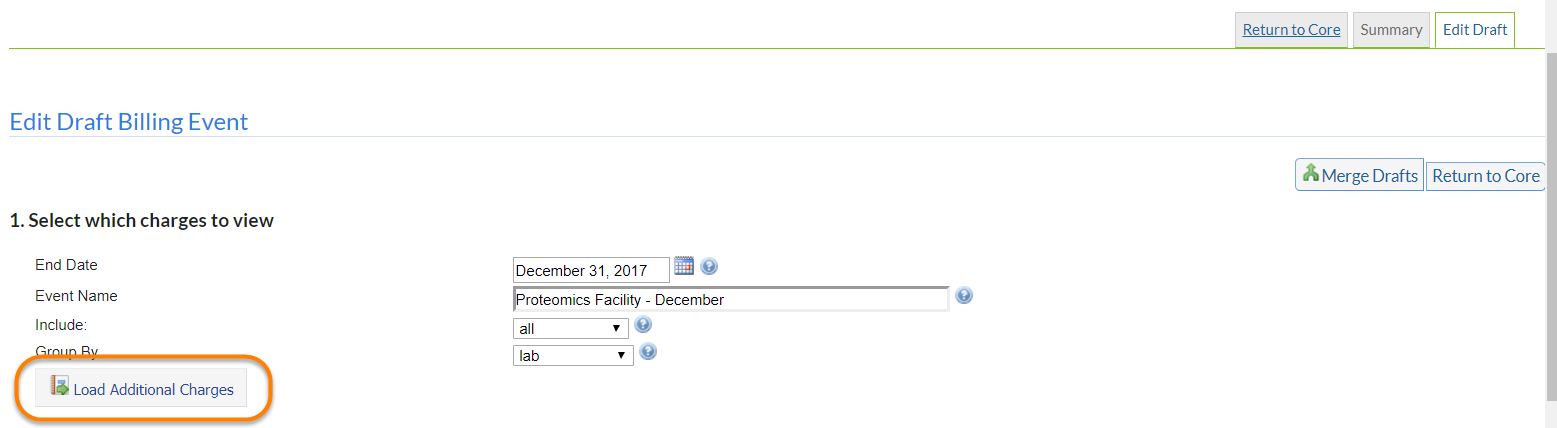
Step 2: You will able to review and update payment for charges. You also have the green action arrow icons that will allow you to add or excluded charges from the draft.

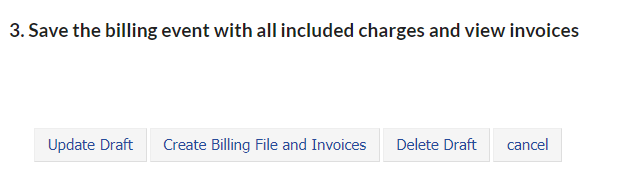
Step 3: Save this event as a draft again by clicking "Update Draft", "Create the Billing File and Invoices", "Delete Draft", or "Cancel" your changes but retain the previous version.
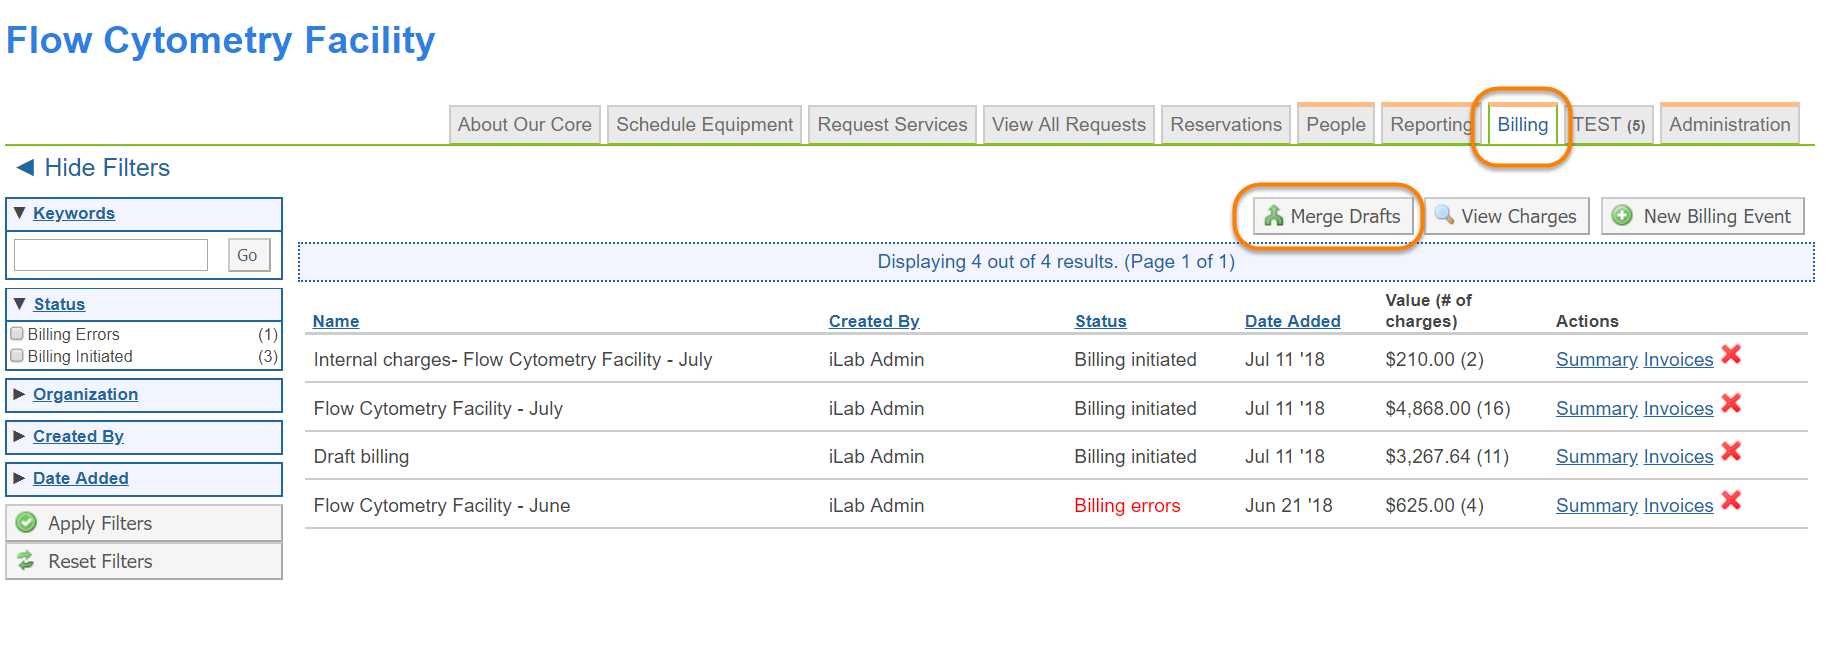
Merge Draft Billing Events
At times, core administrators have created multiple Draft billing events that need to be merged into one final billing event. On the Billing Tab, navigate to the Merge Drafts button. Only billing events from the same core with the same charge grouping on invoices can be merged. Select the events to combine and click 'Merge Drafts' button.

Summary Tab
The summary tab gives an overview of the charges that are included in the billing event. The summary tab also allows for the core administrator to send or download their billing file, and email institution administrators a PDF of the summary page.
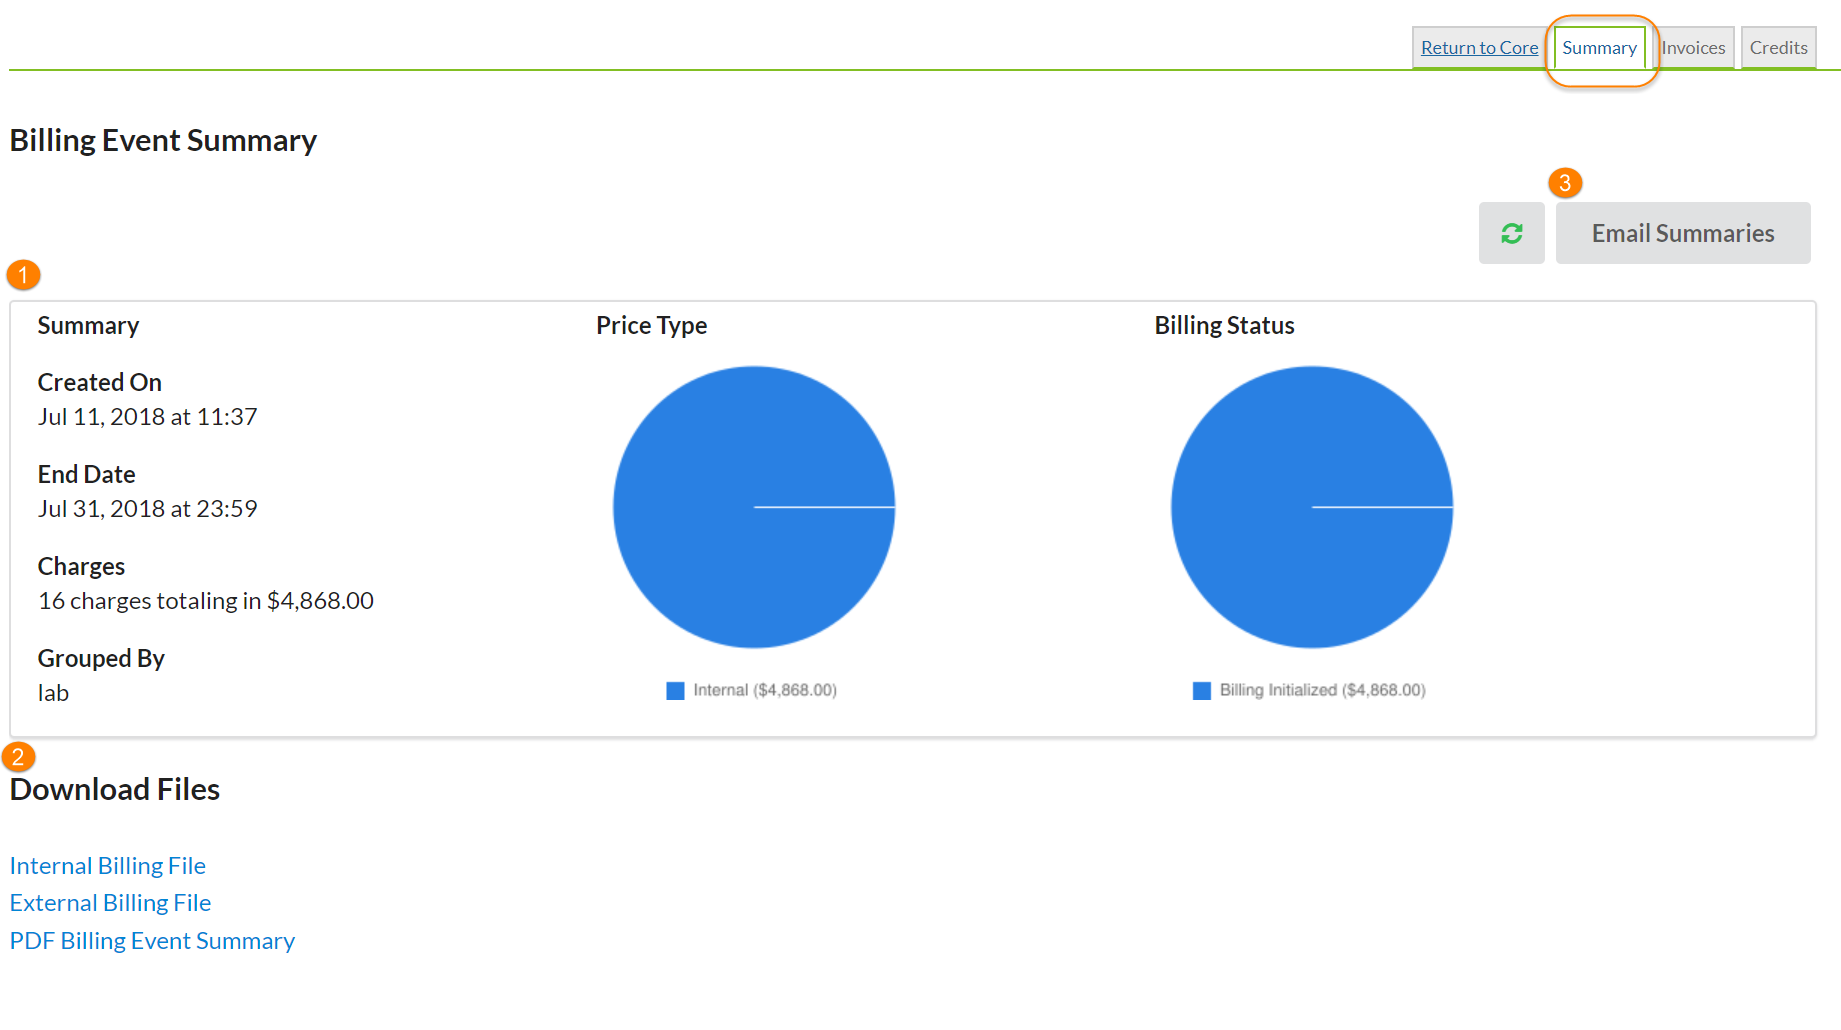
- Summary of Charges: This section outlines high level information about the charges included in the billing event.
- Download Files: The core facility can download billing files. Note: For institutions with integrations, there will also be a button to send the billing file to the institution billing system. File format may differ with integrations.
- Email Summaries: Send an email to institution administrators with the summary information included
For more information visit iLab Managing a Core